OAuth 2.0 동작 방식과 JWT 토큰 발급에 대한 정보는 이전게시글을 참고하시면 됩니다.
프로젝트 생성
시큐리티 적용 전 회원가입 및 기본 로직 작성을 위해 H2, Spring Web, Spring Data Jpa, Lombok만 의존성을 받아 프로젝트를 생성하였다.

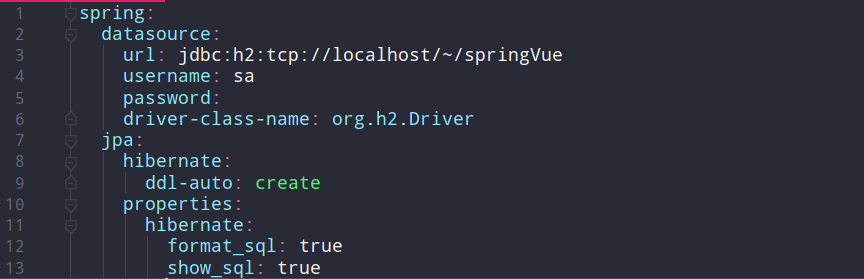
- yaml형식이 가독성이 좋아 application.properties를 application.yml로 변경 후 DB설정 정보를 작성 하였다.
Member 엔티티 생성
@NoArgsConstructor(access = AccessLevel.PROTECTED)
@Getter
@Entity
public class Member {

    @Id
    @GeneratedValue(strategy = GenerationType.IDENTITY)
    private Long id;

    @Column(nullable = false)
    private String email;

    @Column(nullable = false)
    private String password;

    @Column(nullable = false)
    private String name;

    @Enumerated(EnumType.STRING)
    private MemberRole role;

    @Builder
    public Member(String email, String password, String name, MemberRole role) {
        this.email = email;
        this.password = password;
        this.name = name;
        this.role = role;
    }
}

- Member Entity를 생성하였다. 실제 로그인 구현 시 email과 password로 접속을 하게 될 것이고 Role에 따라 권한을 부여할 것이다.
Member DTO


- Entity를 직접적으로 Controller 단에 노출시키는 것은 API 스펙에 영향을 끼칠 수 있으므로 최대한 자제하는 것이 좋아 Dto를 생성하였다.
MemberRepository, MemberService


- Spring Data Jpa를 이용하여 MemberRepository를 생성하였고 차후에 토큰 발급 및 로그인을 위해 email로 찾는 로직을 추가하였다.
- Service단에서는 Member는 저장하는 로직과 Member를 조회하는 로직을 작성하였다.
Spring Security 및 Authorization Server 설정

- Oauth 2.0 설정을 위해 security.oauth.boot:spring-security-oauth2-autoconfigure로 의존성을 추가한다.
- 테스트 코드 작성 시 Base Auth에 클라이언트 아이디와 시크릿을 넣기 위해 security-test도 추가한다.

- 첫 번째로 Password 암호화를 위해 PasswordEncoder를 빈으로 등록한다.

- Member.class에 패스워드를 암호화하는 메서드를 작성하였고 회원가입 시 패스워드가 암호회 된 후 저장되게 할 것이다.

- SpringSecurity에서는 보통 AuthenticationManger가 로그인을 담당하게 되는데 UserDetailsSevice와 PasswordEncoder를 통해 로그인을 관리한다.
- 그러므로 시큐리티를 사용하기 위해서는 두 개를 구현하여야 한다.
- PasswordEncoder는 아까 빈으로 등록하였고 UserDetailsService는 MemberSerive로 구현하면 된다.
- 우선 회원 가입하는 로직을 패스워드를 암호화하고 DB에 저장이 되게 수정하였다.
- UserDetailsService를 구현하게 되면 loadUserByUsername을 오버라이드 하게 된다.
- 여기서 나는 Member가 로그인 시 email로 로그인을 할 것이기 때문에 매개변수를 email로 설정하였다.
- return을 UserDetails로 하게 되면 interface이기 때문에 수많은 메서드들을 구현하여야 한다.
- 그러므로 UserDetails를 상속받아 구현한 User 객체를 만들어 memeber의 정보를 넣어준다.
- 마지막 파라미터에 role을 넣은 것을 알 수 있는데 이것을 통해 나중에 Role에 맞는 권한을 설정할 수 있다.
@EnableWebSecurity
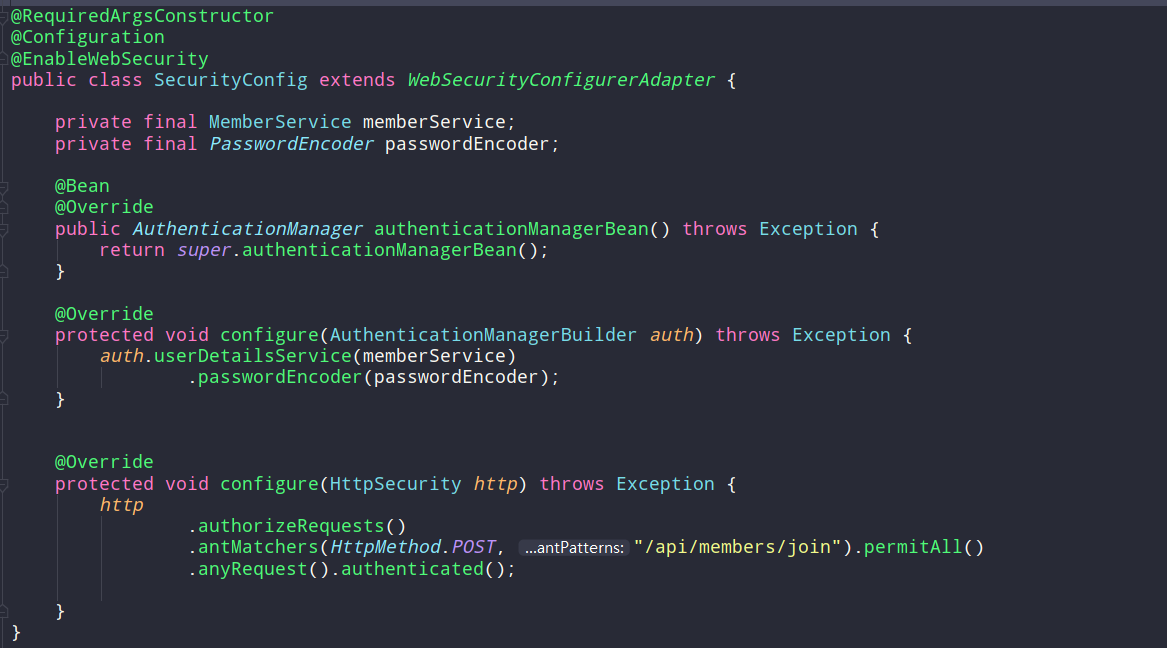
- AuthoriationServer를 설정하기 전에 기본 Security를 설정한다.
- @EnableWebSecurity, WebSecurityConfigurerAdapter를 통해 Spring Security의 설정을 커스텀할 수 있다.
- 우선 AuthenicationManger는 AuthorizationServer에 등록을 하여야 하므로 @Bean으로 등록 한한다.
- 그리고 AuthenicationMangerBuilder에 userDetailsService와 passwordEncoder를 내가 작성한 memeberService와 passwordEncoder로 만들게 설정한다.
- 마지막 configure에서는 더 많은 설정들을 할 수 있지만 간단하게 회원가입을 하는 URL을 제외한 모든 접속은 인증을 필요로 하게 설정하였다.
Authorization Server
@RequiredArgsConstructor
@EnableAuthorizationServer
@Configuration
public class AuthorizationServer extends AuthorizationServerConfigurerAdapter {

    private final PasswordEncoder passwordEncoder;
    private final AuthenticationManager authenticationManager;
    private final MemberService memberService;

    @Value("${custom.clientId}")
    private String clientId;
    @Value("${custom.clientSecret}")
    private String clientSecret;
    @Value("${custom.jwtKey}")
    private String jwtKey;

    @Override
    public void configure(AuthorizationServerSecurityConfigurer security) throws Exception {
        security.passwordEncoder(passwordEncoder);
    }

    @Override
    public void configure(ClientDetailsServiceConfigurer clients) throws Exception {
        clients.inMemory()
                .withClient(clientId)
                .authorizedGrantTypes("password", "refresh_token")
                .scopes("read", "profile")
                .secret(passwordEncoder.encode(clientSecret))
                .accessTokenValiditySeconds(10 * 60)
                .refreshTokenValiditySeconds(6 * 10 * 60);
    }

    @Override
    public void configure(AuthorizationServerEndpointsConfigurer endpoints) throws Exception {
        endpoints.authenticationManager(authenticationManager)
                .userDetailsService(memberService)
                .tokenStore(tokenStore())
                .accessTokenConverter(jwtAccessTokenConverter());
    }

    @Bean
    public TokenStore tokenStore() {
        return new JwtTokenStore(jwtAccessTokenConverter());
    }

    @Bean
    public JwtAccessTokenConverter jwtAccessTokenConverter() {
        JwtAccessTokenConverter converter = new JwtAccessTokenConverter();
        converter.setSigningKey(jwtKey);
        return converter;
    }
}- AuthorizationServer는 @EnableAuthorizationServer와 AuthoizationServerConfigurerAdapter를 통해 설정할 수 있다.
- 첫 번째 configure에서는 클라이언트 시크릿도 빈으로 등록한 passwordEncoder로 암호화하는 하는 것이다.
- 두 번째 configure에서 client를 설정하면 되는데 토큰 발급 정보를 넣으면 된다. 현재는 inMemory로 발급하지만 차후에 jdbc로 바꿀 예정이다. ClientId, ClientSecret, scope, GrantTypes, 유효시간 등 토큰에 필요한 정보를 설정하면 된다.
- 세 번째 configure에서는 endpoints를 설정한다. WebSecurity에서 빈으로 등록한 유저 인증정보를 가지고 있는 authenticationManager를 설정하고, userDetialsService도 memeberService로 설정 후 tokenStore와 accessTokenConverter를 JwtToken으로 설정하면 토큰 발급 시 Jwt 토큰으로 발급하게 될 것이다.
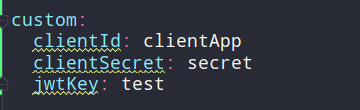
- ClinetId, ClientSecret, jwtKey는 application.yml에 설정하고 그 값을 가져왔다.
Jwt 토큰 발급 확인하기

- 토큰을 발급하는 Test이다. 우선 Member를 db에 저장하고 저장한다.
- 그리고 Basic Auth에 ClientId, ClinetSecret을 넣고 파라미터로 username에는 email을 password에는 password를 그리고 grant_type을 password로 설정한다.
- 그 후 /oauth/token에 POST 요청을 하면 Member가 DB에 존재하면 아래와 같이 토큰을 발급해주는 것을 확인할 수 있다.

서버를 띄워서 Postman으로 확인할 수도 있다.

- 우선 ApplicationRunner를 구현하여 서버가 구동되었을 때 DB에 멤버를 저장하게 하였다.

- Postman에서 Test때와 같이 Authorization의 BasicAuth에 ClientId, Secret를 form-data에 username, password, grant_type를 넣고 Send 하면 토큰이 발급된 것을 확인할 수 있다.

- JWT사이트 에서 발급받은 토큰을 복호화하게 되면 username에 email이 들어있으며 이외에 Role, Client id, 토큰 발급정보들을 확인할 수 있다.
- OAuth 2.0 동작 방식을 보면 알 수 있듯이 ResourceOwner의 정보를 얻기 위해서는 ResourceServer가 있어야 한다.
- 현재 Resource Server를 설정하지 않았으므로 토큰이 있더라도 ReosurceOwner의 Resource를 조회할 수 없다.
- 다음 게시글에 ResourceServer를 설정하여 ResourceOwner의 정보를 받아오는 예제를 구현해볼 것이다.
소스코드는 깃헙에서 참고 가능합니다.
'Study' 카테고리의 다른 글
| SpringBoot와 Vue.js를 이용한 회원가입, 로그인 기능, 권한별 라우터 설정 (1) | 2020.01.04 |
|---|---|
| SpringSecurity OAuth CORS 문제 (0) | 2019.12.31 |
| Vue.js Core Libraries(Vue Router와 Vuex), MD Bootstrap 설치 및 로그인 회원가입 화면 제작 (0) | 2019.12.31 |
| Spring Security OAuth 2.0, Jwt #2(Resource Server) (0) | 2019.12.26 |
| OAuth 2.0, JWT (0) | 2019.12.22 |


